
Wednesday, May 16, 2012
PhotoShop HOLLLLURRRR
Tuesday, May 15, 2012
frog tongue
 For the past couple of days my Art I class has been in the computer lab working a little with PhotoShop. I have never, ever used photoshop before so I thought this was really fun and a nice thing to learn how to do. I also think it will come in handy for when I want to learn to edit more photographs. For this particular image, I thought it came out pretty good. I think if the frog was a little bit bigger on the tongue it would look more realistic but overall definitely not awful. Hopefully I can use photoshop more, and not just in Art I class. Got frog tongues?
Thursday, May 10, 2012
CLAY! CLAY! CLAY! CLAY!

pastels

Thursday, April 19, 2012
Glow Sticking is a Habit, Get Like Me


I had seen quite a bit of glow stick art but I always wondered how it worked. This was another project that was probably one of my favorites. It made it even better that we did it right before Spring break so every one was excited and glad we didn't have anything too stressful to do. The top picture is SB2K12, which is Spring Break 2012 for any of ya'll who didn't follow. Bri, Lauren, and I each wrote 2 characters in different colors so it came out pretty nice. The next picture is a muffin that I made for Love Muffin. You wouldn't understand. Then the last picture is when Bri took a glow stick and just moved it back and forth for 10 seconds to illuminate the outline of me. It's pretty trippy. Overall, successful project.
perspective photographs


Bri had this idea for me to go lay across a wooden banister so that it would look like I was on top of a ginormous truck. It turned out pretty cool.

A Monster Named Googie
 When Mr.Sands told us we were getting to make mini monsters out of clay I was really excited. I like making unrealistic things, and seem to be a little better at them too. The monster I was assigned to recreate was Googie. This is Googie.
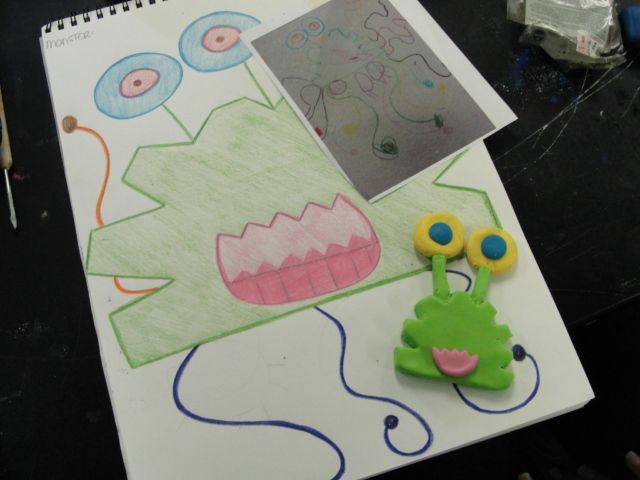 In this next picture you can see the steps I took to recreate him. The photograph is the picture I received when I chose to make Googie. It is the original that the Kindergartner had made. After that I made my own drawing of Googie with a few different colors and more of the way I saw him but definitely still how my Kindergarten kid created him. After all, it is still his(:
 The type of clay I used to make Googie was Sculpey. Everyone was told to use this clay before we started the project but after messing with it for like half an hour and not getting anywhere with it, every one else went to the regular clay. My Sculpey was working for me and I really liked the colors so I decided to stick with it. The arms and leg-type-things were a struggle to figure out how I was going to make. I then thought using wire would make them look much more like they were intended to and plus look good too. This is the final product. I really enjoyed this project and working with clay and I really hope that the student who first drew the picture of Googie enjoys it!
Stencil Art


Friday, March 9, 2012
the finished product


Friday, February 17, 2012
$K!TTL3 M0$@!C (In the Making)
This first image is me working on my mosaic. At this point, it really doesn't look like anything besides a bunch of little skittles.
I'm getting further along with the skittling. From where I was sitting I felt like it still looked like a bunch of mixed up colors but it took me standing up and from a distance to realize that it was slowly starting to look like my face.
 |
 |
The mosaic is actually starting to resemble my face as I skittle more and more!

This is how far I've gotten so far. Finishing the eyes definitely made a difference in the appearance of my mosaic. I'm pretty happy with how it's turning out so far, and I'm really eager to see how the finished product will look. Until then, EVERY DAY I'M SKITTLING! lolz.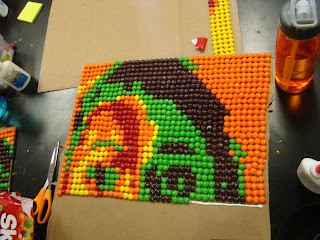

Thursday, February 9, 2012
Shading Portrait

SHADOW ART #awwwyeahhh


expressive photo (skittle colors)

Wednesday, February 1, 2012
Masking Tape Project

My group- aka Team of the Future- used masking tape to create the illusion of the path to your future. We used the typical things people look for in their future such as graduation, getting a job and earning money from it, buying a house, and eventually getting married. We used cross hatching to make our hills seem more alive and to show distance.
Subscribe to:
Posts (Atom)